|
查看:
13317
回复: 16 |
参赛作品《蓝牙指纹锁》
|


Holger
2
主题
7
回复 |
1#
电梯直达

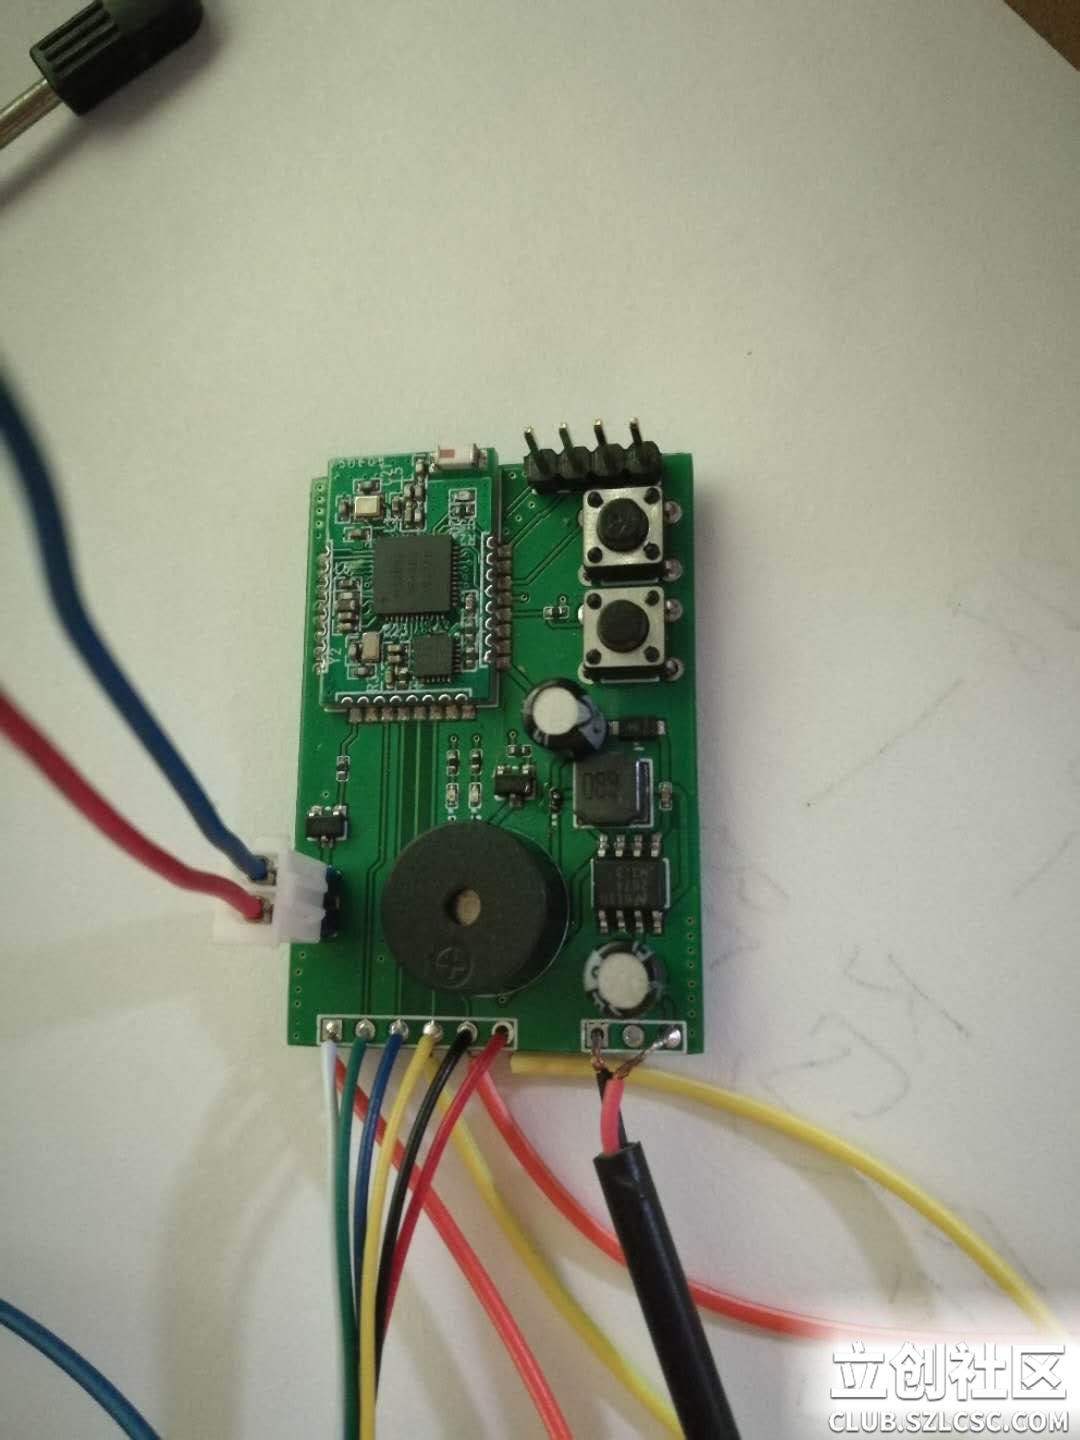
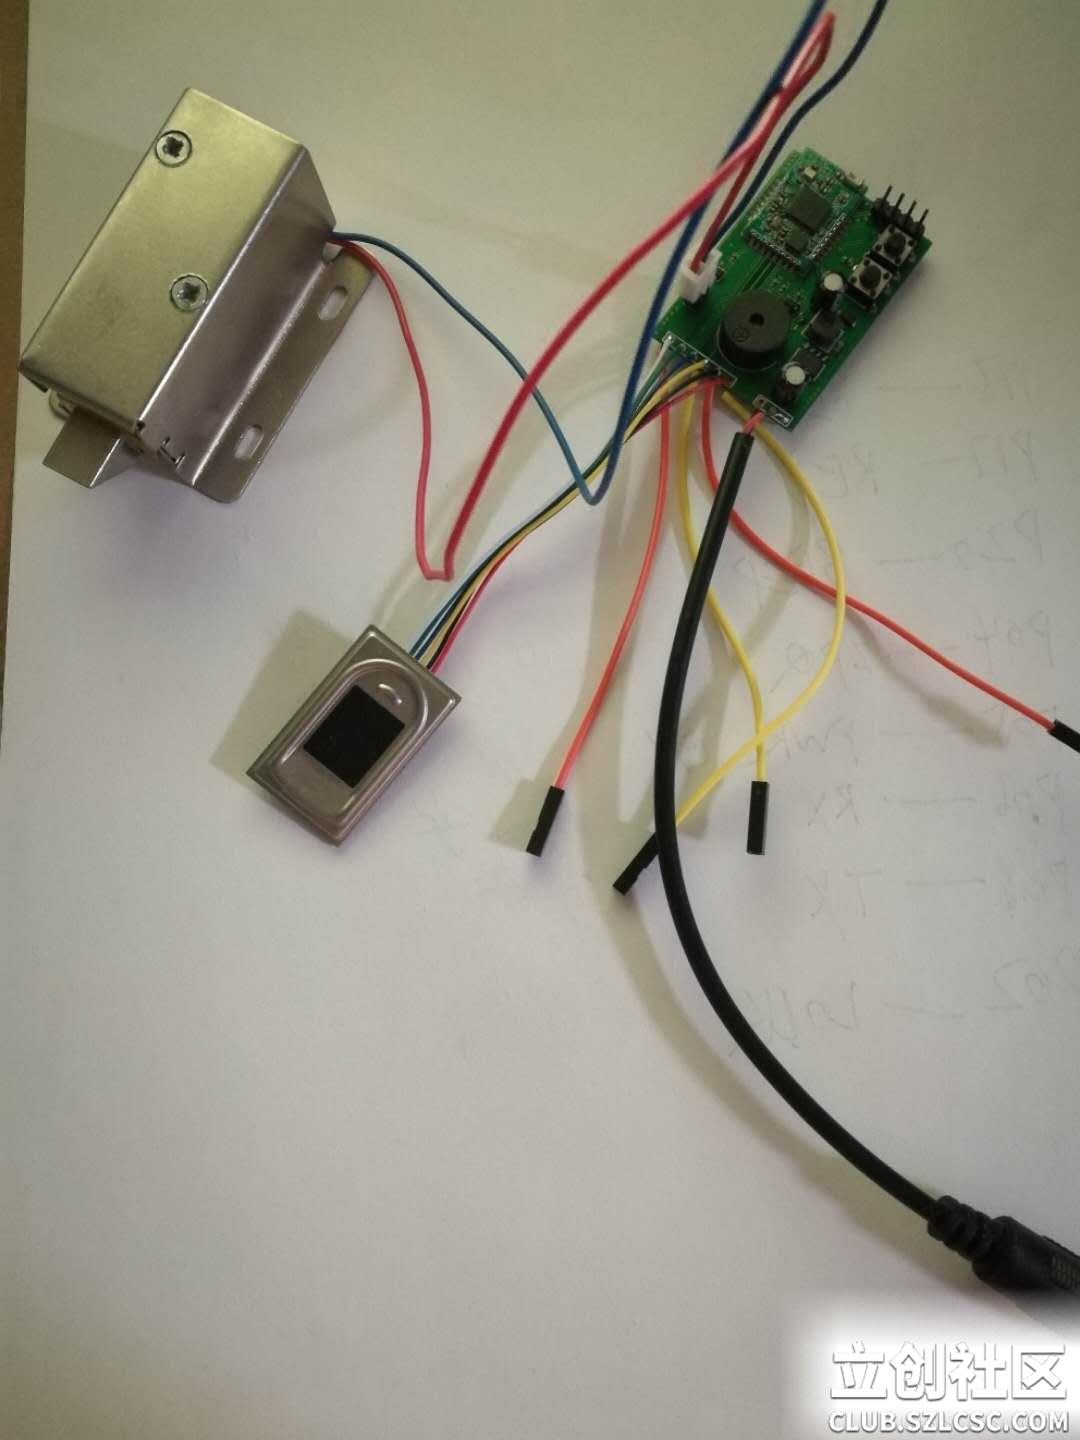
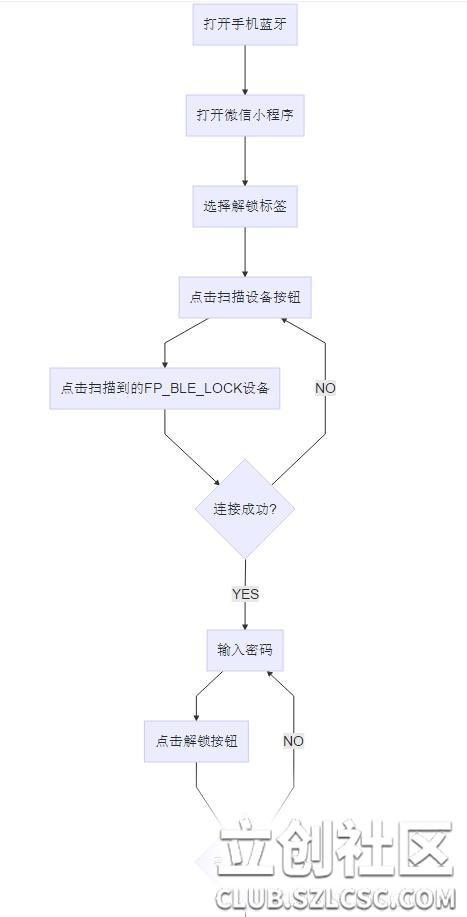
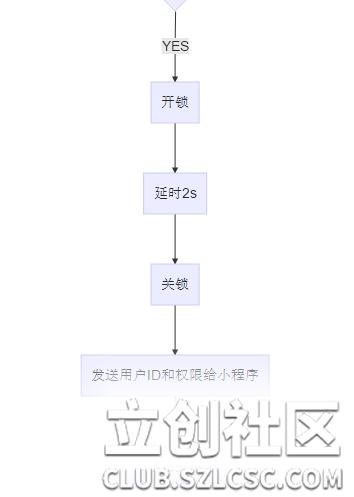
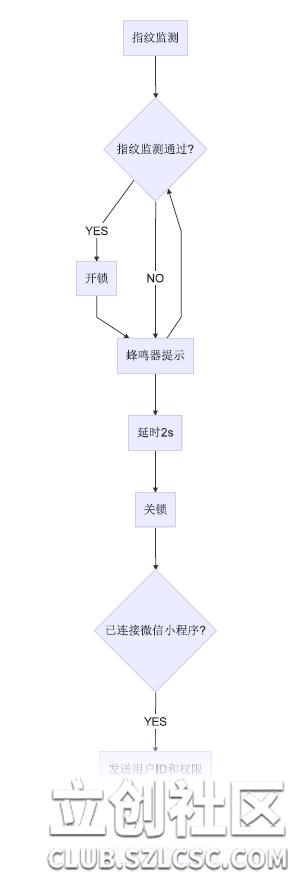
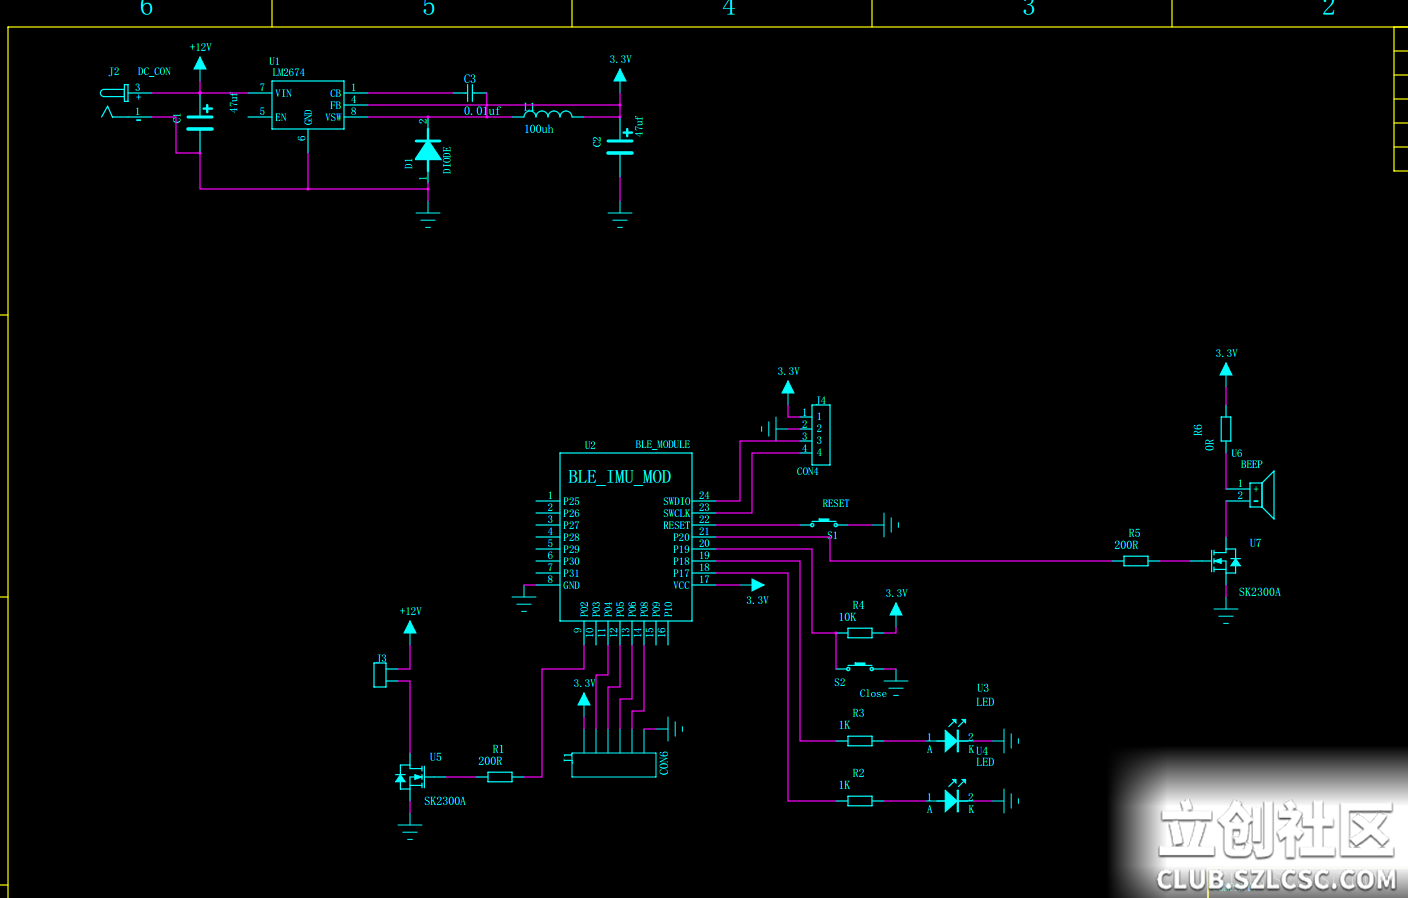
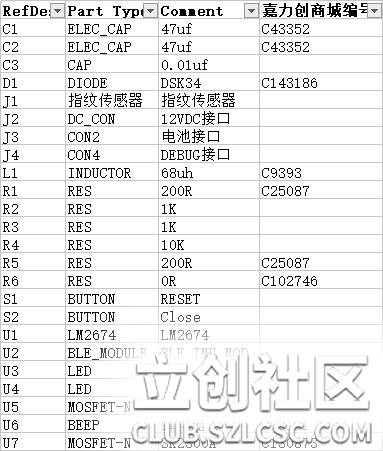
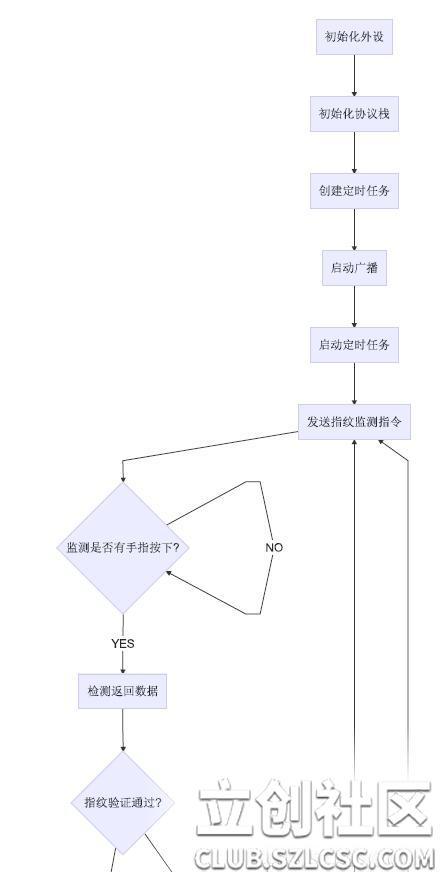
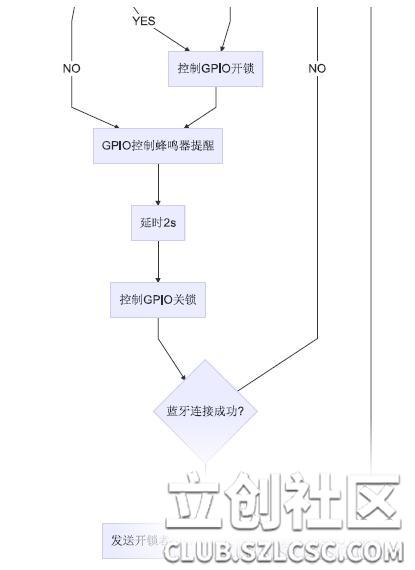
【报名阶段需要填写的内容】 1. 参赛者姓名(必填项):Holger 2. 单位或学校名称(选填项):个人 3. 当前职务或职称(选填项):工程师 4. 参赛作品的名字(必填项):蓝牙指纹锁 5. 简要陈述您的idea和作品(必填项):门外通过蓝牙和指纹解锁,自动唤醒,门内通过按键开关门锁。 6. 拟用到的立创商城在售物料(必填项):电阻电容、蜂鸣器、按键等 7. 拟用到的非立创商城物料或其它补充(必填项):NRF52832,LM2674,指纹传感器,锁体等。 8. 拟用到的EDA工具软件名称(必填项):PADS 【作品正式发表(报名成功后进入设计阶段)需要填写的内容】 一、作品简介 例如,可以包括但不局限于以下内容: 1.作品实物图,第一张是核心板的实物图,第二张是整体的实物图 作品上多余的杜邦线是方便调试使用的。 2.目前人们对安全性越来越重视,在保证安全性的前提下,提升用户的体验也非常重要。对于传统的门锁,使用实体的钥匙不仅携带不方便,而且容易忘带,如果是丢在其他地方还好,就是花点时间去取。但是不小心丢在家里,然后门关上了,这将会是意见很郁闷的事(亲身经历,感受颇深!)。而蓝牙指纹锁可以避免这样的情况发生,首先是指纹采集,指纹受基因和环境的双重影响,重复率极低,所以可以作为人的唯一标识ID,安全性和便携性都能满足。对于蓝牙大家都很熟悉,作品中使用的是蓝牙4.0,也就是BLE,专门针对低数据率,低功耗应用场景的。可以使用手机蓝牙进行解锁,安全性方面,可以在软件中加入非对称加密。在屋内,无需使用指纹和蓝牙解锁,只需通过一个按键即可进行解锁。对于市场前景,目前市面上指纹锁太多,这个已经说明指纹锁的市场,但都是指纹+WIFI+密码等组合,本作品加入使用非常普遍的蓝牙,提升方便性,并可以方便接入物联网。 3.使用蓝牙和指纹相结合的方式,保证安全性的前提下,提升用户体验。指纹和手机是现在人们不可缺少的部分。 二、系统构架图 1. 硬件框图 2. 功能流程图 2.1 蓝牙解锁 2.2 按键解锁 2.3 指纹解锁 三、硬件部分的描述 1.原理图 2.电源部分使用LM2674将12V电源转换为3.3V给单片机供电,这里使用12V电源供电是因为锁体需要使用12V驱动。蓝牙模块通过GPIO引脚控制MOS管来进行锁体的开关;同样的原理控制蜂鸣器。对于LED直接使用GPIO进行驱动。加入两个按键,一个是复位按键(在实际应用中使用不到,这个只是在开发阶段使用),另一个是开关按键,用于内部控制锁体的开关。连接器J4是调试接口,连接JLINK仿真器的,这个只在开发调试的时候使用。连接器J1用于连接指纹模块,与指纹模块之间通过串口进行通信。 3.使用PADS设计的原理图和PCB 四、材料清单(BOM列表) 五、软件部分的描述(选填) 软件分为两个部分,一个是蓝牙指纹锁的固件,另一个是微信小程序。 蓝牙指纹锁固件是基于NRF52832的SDK15开发的,在蓝牙协议栈的基础上,添加外设驱动(串口,GPIO,中断,主要就是这三个),然后添加定时任务来调度这些外设。大致流程如下: 蓝牙接收函数: static void nus_data_handler(ble_nus_evt_t * p_evt)
{
if (p_evt->type == BLE_NUS_EVT_RX_DATA)
{
uint32_t err_code;
memcpy(ble_rec_buffer, p_evt->params.rx_data.p_data, p_evt->params.rx_data.length);
ble_qrcode_flag = 1;
// err_code = app_timer_start(m_qrcode_dis_timer_id, QRCODE_DIS_INTERVAL, NULL);
// APP_ERROR_CHECK(err_code);
NRF_LOG_DEBUG("Received data from BLE NUS. Writing data on UART.");
NRF_LOG_HEXDUMP_DEBUG(p_evt->params.rx_data.p_data, p_evt->params.rx_data.length);
if((ble_rec_buffer[4] == '1')&&(ble_rec_buffer[5] == '2')&&(ble_rec_buffer[6] == '3')&&(ble_rec_buffer[7] == '4'))
{
nrf_gpio_pin_set(BEEP_PIN);
err_code = app_timer_start(m_beep_id, BEEP_INTERVAL, NULL);
APP_ERROR_CHECK(err_code);
nrf_gpio_pin_set(FP_LOCKER);
err_code = app_timer_start(m_locker_id, LOCKER_INTERVAL, NULL);
APP_ERROR_CHECK(err_code);
}
}
} 串口接收数据处理函数:
void uart_event_handle(app_uart_evt_t * p_event)
{
    static uint8_t data_array[BLE_NUS_MAX_DATA_LEN];
    static uint8_t index = 0;
    uint32_t       err_code;
	uint8_t cnt_i = 0;
	uint8_t ble_send_buf[20] = "ID:";
	uint8_t fp_check_flag = 1;

    switch (p_event->evt_type)
    {
        case APP_UART_DATA_READY:
            UNUSED_VARIABLE(app_uart_get(&data_array[index]));
            index++;
				if(data_array[0]==0xf5)
				{
            if ((data_array[index - 1] == 0xf5)&&(index > 2))
            {
							nrf_gpio_pin_set(BEEP_PIN);
                NRF_LOG_DEBUG("Ready to send data over BLE NUS");
                NRF_LOG_HEXDUMP_DEBUG(data_array, index);
		ble_send_buf[3] = data_array[2]+0x30;
		ble_send_buf[4] = data_array[3]+0x30;
		ble_send_buf[5] = ' ';
		switch(data_array[4])
		{
		case 0x01:
		ble_send_buf[6] = 'g';
			ble_send_buf[7] = 'u';
			ble_send_buf[8] = 'e';
			ble_send_buf[9] = 's'; ble_send_buf[10] = 't';
			ble_send_buf[11] = ' ';
			break;
			case 0x02: ble_send_buf[6] = 'f';
			 ble_send_buf[7] = 'a';
			ble_send_buf[8] = 'm';
			ble_send_buf[9] = 'i';
			ble_send_buf[10] = 'l';
			ble_send_buf[11] = 'y';
			break;
			case 0x03:
			ble_send_buf[6] = 'r';
			ble_send_buf[7] = 'o';
			ble_send_buf[8] = 'o';
			ble_send_buf[9] = 't';
			ble_send_buf[10] = ' ';
			ble_send_buf[11] = ' ';
			break;
			default:
			ble_send_buf[6] = 'N';
			ble_send_buf[7] = 'o';
			ble_send_buf[8] = 'n';
			ble_send_buf[9] = 'e';
			ble_send_buf[10] = ' ';
			ble_send_buf[11] = ' ';
			fp_check_flag = 0;
			break;
		}
                do
                {
                    uint16_t length = 12;//(uint16_t)index;
                    err_code = ble_nus_data_send(&m_nus, ble_send_buf, &length, m_conn_handle);
                    if ( (err_code != NRF_ERROR_INVALID_STATE) && (err_code != NRF_ERROR_BUSY) &&
                         (err_code != NRF_ERROR_NOT_FOUND) )
                    {
                        APP_ERROR_CHECK(err_code);
                    }
                } while (err_code == NRF_ERROR_BUSY);

		for(cnt_i=0;cnt_i<index;cnt_i++)
		{
		data_array[cnt_i] = 0;
		}

                index = 0;
		uart_qrcode_flag = 1;
		err_code = app_timer_start(m_fp_check1n_id, FP_CHECK_INTERVAL, NULL);
		APP_ERROR_CHECK(err_code);

		err_code = app_timer_start(m_beep_id, BEEP_INTERVAL, NULL);
		APP_ERROR_CHECK(err_code);
            break;  default:
            break;
    }
}
微信小程序,涉及到H5,CSS,JS的开发,微信在这些基础上做了修改,但是基本内容是不变的。直接调用官方提供的API即可,使用的API如下: https://developers.weixin.qq.com/miniprogram/dev/api/bluetooth.html 页面显示代码lock.wxml: <wxs module="utils">
module.exports.max = function(n1, n2) {
return Math.max(n1, n2)
}
module.exports.len = function(arr) {
arr = arr || []
return arr.length
}
</wxs>
<view class="search_device">
<button class="search_device" bindtap="openBluetoothAdapter">扫描设备</button>
</view>
<!--button bindtap="stopBluetoothDevicesDiscovery">停止扫描</button-->
<!--button bindtap="closeBluetoothAdapter">结束流程</button-->
<input class="pwd_input" name="userName" password="true" placeholder="请输入密码" bindinput="userNameInput" value='{{inputValue}}'></input>
<view class="unlock">
<button disabled="{{canWrite}}" size="mini" bindtap="writeBLECharacteristicValue">解锁</button>
</view>
<view class="devices_summary">已发现 {{devices.length}} 个外围设备:</view>
<scroll-view class="device_list" scroll-y scroll-with-animation>
<view wx:for="{{devices}}" wx:key="index"
data-device-id="{{item.deviceId}}"
data-name="{{item.name || item.localName}}"
bindtap="createBLEConnection"
class="device_item"
hover-class="device_item_hover">
<view style="font-size: 16px; color: #333;">{{item.name}}</view>
<view style="font-size: 10px">信号强度: {{item.RSSI}}dBm ({{utils.max(0, item.RSSI + 100)}}%)</view>
<view style="font-size: 10px">UUID: {{item.deviceId}}</view>
<view style="font-size: 10px">Service数量: {{utils.len(item.advertisServiceUUIDs)}}</view>
</view>
</scroll-view>
<view class="connected_info" wx:if="{{connected}}">
<view>
<text>已连接到 {{name}}</text>
<view class="operation">
<!--button wx:if="{{canWrite}}" size="mini" bindtap="writeBLECharacteristicValue">写数据</button-->
<button disabled="{{canWrite}}" size="mini" bindtap="closeBLEConnection">断开连接</button>
</view>
</view>
<view wx:for="{{chs}}" wx:key="index" style="font-size: 12px; margin-top: 10px;">
<!--view>特性UUID: {{item.uuid}}</view-->
<view>解锁ID: {{state_lock}}</view>
<view wx:if="{{user_dis}}">ID权限: {{user_id}}</view>
</view>
</view> 蓝牙代码lock.js
const app = getApp()

var ble_send_data = new String()
var ble_send_data_arr = new ArrayBuffer(20)
var timer

function inArray(arr, key, val) {
  for (let i = 0; i < arr.length; i++) {
    if (arr[i][key] === val) {
      return i;
    }
  }
  return -1;
}

// ArrayBuffer转16进度字符串示例
function ab2hex(buffer) {
  var hexArr = Array.prototype.map.call(
    new Uint8Array(buffer),
    function (bit) {
      //return ('00' + bit.toString(16)).slice(-2)
      return String.fromCharCode(bit)
    }
  )
  return hexArr.join('');
}

Page({
  inputValue: '',
  data: {
    devices: [],
    connected: false,
    chs: [],
    input_data: [],
    canWrite: true,
    state_lock: '00',
    user_id: 'root',
    user_dis: false
  },

  onPullDownRefresh: function () {
    wx.showToast({
      title: '扫描设备...',
      icon: 'loading'
    })
    this.openBluetoothAdapter()
  },

  openBluetoothAdapter() {
    wx.openBluetoothAdapter({
      success: (res) => {
        console.log('openBluetoothAdapter success', res)
        this.startBluetoothDevicesDiscovery()
      },
      fail: (res) => {
        setTimeout(function () {
          wx.showToast({
            image: "../普通警告.png",
            title: '请先打开蓝牙!',
          })
        }, 2000)
        if (res.errCode === 10001) {
          wx.onBluetoothAdapterStateChange(function (res) {
            console.log('onBluetoothAdapterStateChange', res)
            if (res.available) {
              this.startBluetoothDevicesDiscovery()
            }
          })
        }
      }
    })
  },
  stopBluetoothDevicesDiscovery() {
    wx.stopBluetoothDevicesDiscovery()
  },
  createBLEConnection(e) {
    const ds = e.currentTarget.dataset
    const deviceId = ds.deviceId
    const name = ds.name
    wx.showLoading({
      title: '蓝牙连接中...',
    })
    timer = setTimeout(function () {
      wx.hideLoading()
      wx.showToast({
        image: '../叉号.png',
        title: '连接失败!',
        success: function (res) {
          setTimeout(function () {
            wx.hideToast()
          }, 2000)
        }
      })
    }, 10000)
    wx.createBLEConnection({
      deviceId,
      timeout: 10000,
      success: (res) => {
        this.setData({
          connected: true,
          name,
          deviceId,
        })
        wx.hideLoading()
        clearTimeout(timer)
        wx.showToast({
          title: '连接成功!',
        })
        this.getBLEDeviceServices(deviceId)
      },
      fail: (res) => {
        wx.closeBLEConnection({
          deviceId,
          success: function (res) {
            console.log("停止连接成功!")
          },
          fail: function (res) {
            console.log("停止连接失败!")
          }
        })
      }
    })
    this.stopBluetoothDevicesDiscovery()
  },

    // 操作之前先监听,保证第一时间获取数据
    wx.onBLECharacteristicValueChange((characteristic) => {
      const idx = inArray(this.data.chs, 'uuid', characteristic.characteristicId)
      const data = {}
      var ble_data_arr = new Uint8Array(characteristic.value)

      this.setData(data)
      if ((ble_data_arr[3] == 0x30) && (ble_data_arr[4] == 0x30))
      {
        this.setData({
          state_lock: 'No user',
          user_dis: true
        })
      } else{
        this.setData({
          state_lock: (ble_data_arr[3]-48)*10 + (ble_data_arr[4]-48),
          user_dis: true
        })
      }
      if (ble_data_arr[6] == 0x67) {
        this.setData({
          user_id: 'guest'
        })
      }
      if (ble_data_arr[6] == 0x66){
        this.setData({
          user_id: 'family'
        })
      }
      if(ble_data_arr[6] == 0x72){
        this.setData({
          user_id: 'root'
        })
      }
      if(ble_data_arr[6] == 0x4e){
        this.setData({
          user_id: 'None'
        })
      }
    })
  },
  writeBLECharacteristicValue() {
    let arrbuf = new Int8Array(ble_send_data_arr)
    let strs = ble_send_data.split("")
    let str_pwds = str_pwd.split("")
    for (let i = 0; i < str_pwds.length; i++) {
      arrbuf[i] = str_pwds[i].charCodeAt();
    }
    for (let i = 0; i < strs.length; i++) {
      arrbuf[i + 4] = strs[i].charCodeAt();
    }
    wx.writeBLECharacteristicValue({
      deviceId: this._deviceId,
      serviceId: this._serviceId,
      characteristicId: this._characteristicId,
      value: ble_send_data_arr,
      success: function (res) {
        console.log('writeBLECharacteristicValue success', res.errMsg)
      },
      fail: function (res) {
        console.log('writeBLECharacteristicValue fail', res.errMsg)
      }
    })
  },
  closeBluetoothAdapter() {
    wx.closeBluetoothAdapter()
    this._discoveryStarted = false
  },
})
六、作品演示 作品演示视频:https://v.qq.com/x/page/r07620fkwqm.html 作品上多余的杜邦线是方便调试使用的。 七、总结 在硬件方面,调试过程中遇到很多问题,但是冷静下来调试,都解决了。自己也学习了微信小程序的开发,后台的开发。但是对于本次设计的功能还不完善,只是实现了基本的功能。比如指纹是事先通过软件录入的等等,指纹的功能还没有完全开发,后面会进行完善。后面会将小程序的功能完善,并加入后台服务器,可以远程记录数据,还可以设计一个中继器,直接连接到云端。还有蓝牙解锁也需要实现加密,如果有开源的加密代码最好,接下来会按照自己的想法去完善这些功能。 
|

立创工程小陈
6
主题
548
回复 |
2#
恭喜您已经报名成功!
您现在就可以开始进行设计工作了,后期相关内容请在一楼编辑进行完善。 当前所有参赛选手分值统计表及活动详细介绍见:http://club.szlcsc.com/article/details_12591_1.html 
立创商城电子制作节(审核专员)
|
|


 发表于2018-06-08 10:09:02



 收藏
收藏
